How to Clean a DYMO LabelWriter: The Complete Maintenance Guide for 2026
A single speck of adhesive residue can be the difference between a seamless despatch day and a bin full of wasted shipping labels. If you've ever dealt with a sudden jam during a high-volume print run or noticed white streaks across your labels, you'll know the frustration of a workflow grinding to a halt. Many users feel hesitant when learning how to clean a DYMO LabelWriter because they fear damaging the sensitive thermal printhead, especially on advanced models like the LabelWriter 550 or 5XL.
You don't have to wait for a total hardware failure to take action. This guide provides the professional steps to maintain your equipment safely, helping you eliminate those annoying print errors while extending the life of your hardware. You'll learn the correct way to use specialised cleaning cards and manual techniques to ensure your labels remain crisp and professional. We'll walk through a complete maintenance routine designed to keep your office or warehouse running without interruption, ensuring your printer stays as reliable as the day you unboxed it.
Key Takeaways
- Recognise the specific warning signs of a dirty printhead, such as horizontal white lines and patchy text that can make your shipping labels unscannable.
- Follow a professional step-by-step process for using cleaning cards to maintain your printer without risking damage to sensitive internal sensors.
- Discover the safe manual techniques for how to clean dymo labelwriter rollers and printheads when dealing with stubborn adhesive buildup.
- Minimise future maintenance issues by understanding the link between genuine DYMO label rolls and reduced adhesive residue in Australian warehouse conditions.
- Implement a simple maintenance schedule and staff training plan to extend the operational life of your LabelWriter 550 or 5XL series printers.
Recognising the Signs: Does Your DYMO LabelWriter Need Cleaning?
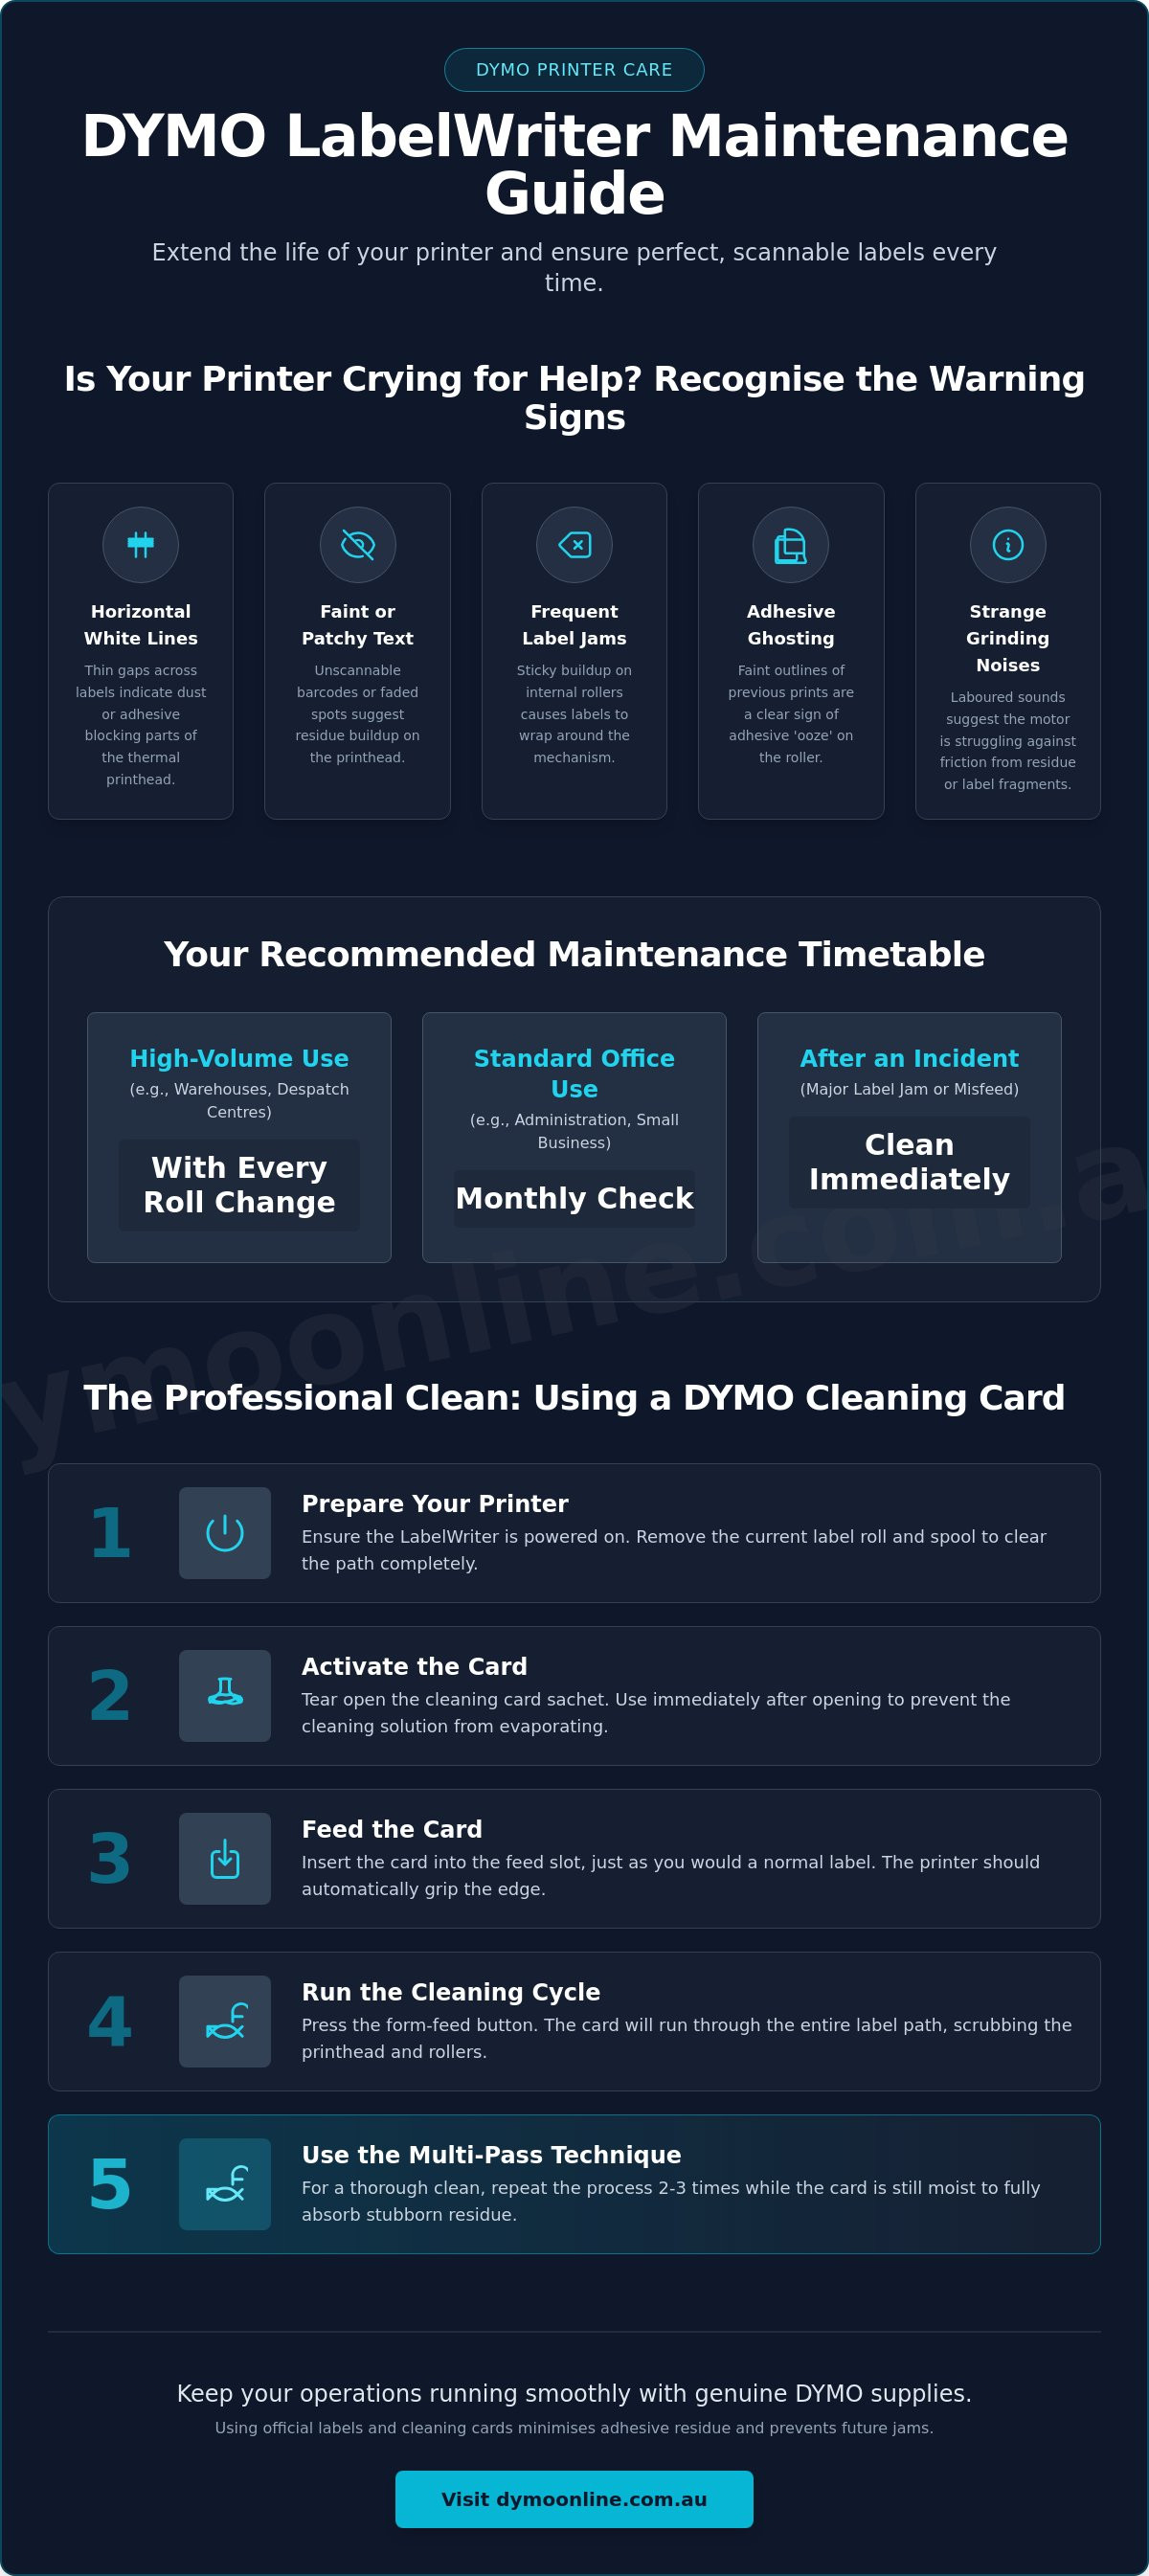
Maintaining a LabelWriter isn't just about fixing problems when they occur; it's about identifying the subtle shifts in performance before they lead to a complete breakdown. When you notice your print quality declining, it's often a physical issue rather than a software glitch. Understanding how to clean dymo labelwriter hardware starts with recognising these five key warning signs:
- Horizontal white lines: These often appear as thin, consistent gaps running across your shipping labels, indicating that dust or adhesive is blocking specific parts of the thermal elements.
- Faint or patchy text: If your barcodes are becoming unscannable or the text looks faded in certain spots, the printhead likely has a layer of carbonised residue.
- Frequent label jams: Sticky buildup on the internal rollers can cause labels to wrap around the mechanism or trigger 'out of paper' errors despite having a full roll loaded.
- Adhesive ghosting: You might see faint outlines or "shadows" of previous labels on your new prints, which is a clear sign of adhesive 'ooze' on the platen roller.
- Strange grinding noises: A laboured sound during the label feed process suggests the motor is struggling against friction caused by old label fragments or thick residue.
The Impact of Dust and Debris on Thermal Printing
DYMO machines rely on thermal printing technology to produce crisp images without the need for ink or toner. This process uses a heated printhead that makes direct contact with chemically treated labels. Even microscopic dust particles can act as an insulator, preventing the heat from reaching the label surface correctly. This results in 'blurry' text that lacks the sharp edges required for professional logistics. The platen roller also plays a vital role by maintaining consistent tension; if it becomes coated in adhesive, it can cause the labels to slip, leading to misaligned prints that look like software errors but are purely mechanical.
When to Clean: Recommended Maintenance Intervals
Establishing a routine is the most effective way to protect your investment in hardware like the LabelWriter 5XL or 550 Turbo. For high-volume Australian warehouses running hundreds of label rolls daily, we recommend the 'Every Roll' rule. At DymoOnline, we advise running a cleaning card through the machine each time you swap out a roll of labels to keep the internal path clear. For standard office use, a monthly check is usually sufficient to prevent long-term buildup. You should also perform a thorough cleaning immediately after any major label jam to remove any leftover adhesive that could cause the next roll to stick.
The Step-by-Step Guide to Using DYMO Cleaning Cards
Using a specialised cleaning card is the most reliable method for maintaining your printer's internal components without the need for complex disassembly. It's the standard professional approach for anyone looking at how to clean dymo labelwriter hardware while protecting the manufacturer's warranty. This process cleans the printhead and the platen roller simultaneously as the card moves through the feed path.
- Preparation: Ensure your LabelWriter is powered on. You'll need the motor to be active to pull the card through. Remove the current label roll and the spool to ensure the path is completely clear.
- Activation: Tear open the cleaning card sachet and remove the saturated card. These cards are designed for single-session use and should be used immediately after opening to prevent the cleaning solution from evaporating.
- Feeding: Insert the card into the feed slot just as you would with a standard shipping label. The printer should grip the edge of the card.
- Cleaning Cycle: Press the form-feed button on the front of the machine. This action runs the card through the entire label path, allowing the textured surface to scrub the printhead and rollers.
- The Multi-Pass Technique: To achieve a thorough result, repeat the process two or three times. Re-inserting the same card while it's still moist ensures that stubborn residue loosened during the first pass is fully absorbed.
Why Official Cleaning Cards are the Preferred Method
Official DYMO cleaning cards feature a specific chemical composition that targets adhesive 'ooze' without leaving a filmy residue. The fabric's texture is engineered to provide enough friction to clean the platen roller without causing abrasions to the thermal elements. This is especially critical for the LabelWriter 550 series. These newer models rely on sensitive sensors to detect genuine labels, and using non-approved cleaning agents can cloud these sensors or cause permanent damage to the thermal printing surface.
Maximising the Life of Your Cleaning Cards
Proper storage is essential because these cards rely on an alcohol-based solution. Keep your packs in a cool, dark place to maintain their effectiveness. When using a card, check the surface after each pass. If you see heavy black or grey streaks, the card has hit its dirt threshold and should be discarded to avoid re-depositing grime back into the machine. You can stock up on genuine packs through our DYMO accessories section. If you have questions about maintaining your specific model in a dusty warehouse environment, please contact our specialist team for guidance.
Manual Cleaning Techniques for Stubborn Adhesive Build-up
When cleaning cards fail to remove baked-on residue, a more direct approach is necessary. Learning how to clean dymo labelwriter components manually allows you to target the specific areas where adhesive tends to pool, such as the corners of the printhead or the underside of the exit path. This level of maintenance is typically required after a significant label jam or if the printer hasn't been serviced for several months. It's a precise task that requires a steady hand and the right materials to avoid permanent hardware damage.
Safety is the first priority. Always disconnect the power supply and USB cable before opening the casing. Once the machine is unpowered, lift the cover and remove the label spool to reveal the internal mechanism. You'll need a lint-free cloth or high-quality cotton buds and a bottle of isopropyl alcohol with a concentration of at least 90%. Lower concentrations contain more water, which takes longer to dry and increases the risk of moisture entering the internal circuitry.
Locate the dark, narrow strip that runs across the width of the printer. This is the thermal printhead. Dampen your cotton bud, ensuring it isn't dripping, and wipe the strip in a single, consistent direction. Avoid scrubbing back and forth, as this can trap grit against the sensitive surface. Continue this process until the bud comes away clean. You should also wipe the label sensor, which is the small plastic window near the feed path, to prevent "out of paper" errors caused by dust interference.
Cleaning the Platen Roller and Label Cutter
The platen roller is the rubber cylinder that drives the labels forward. To clean it thoroughly, you must rotate it manually to access the entire 360-degree surface. Use your cloth dampened with alcohol to wipe away any grey or black "glaze" caused by label backing. While you're there, inspect the serrated cutter bar. Paper scraps often get caught in the teeth, leading to jagged tears. Never use a screwdriver or metal blade to scrape these away. A firm plastic tool or a dry toothbrush is a much safer choice for dislodging debris without dulling the blade.
Safety Precautions and Common Mistakes
Your skin contains natural oils that can cause "hot spots" on the thermal elements, leading to premature failure. Never touch the printhead with your bare fingers. Another common error is over-saturation. If alcohol seeps into the internal electronics, it can cause a short circuit when the machine is turned back on. Always wait at least five minutes for the components to air-dry completely before reconnecting the power. If you find that manual cleaning doesn't restore your print quality, it may be time to consider a replacement LabelWriter to maintain your office or warehouse efficiency.
Preventing Jams and Maintaining Quality in Australian Conditions
Australian warehouses and small businesses often contend with environmental factors that accelerate the need for hardware maintenance. High ambient temperatures and significant dust levels can interfere with the precision of thermal printing. While mastering how to clean dymo labelwriter components is a necessary skill, reducing the frequency of these cleanings through better prevention saves time and prevents unnecessary wear on the printhead. Adhesive "ooze" is a common issue in warmer climates; when the temperature rises, the adhesive on label rolls can soften and seep from the edges, eventually coating the internal rollers.
Workspace organisation plays a vital role in printer longevity. Position your LabelWriter away from open loading docks or windows where dust and grit are more likely to enter the label feed path. Dust is abrasive; when it sticks to the adhesive residue inside the machine, it creates a grinding paste that can permanently score the thermal printhead. Keeping the printer cover closed at all times and using a can of compressed air to blow out the feed path weekly can significantly reduce the risk of sensor failure.
The Role of Genuine DYMO Labels in Maintenance
There is a direct correlation between the quality of the labels you use and the cleanliness of your printer. Generic labels often use inferior adhesives that lack the thermal stability of genuine LabelWriter labels. These third-party adhesives are more prone to melting onto the printhead during the heating process. Genuine DYMO labels feature "clean-peel" technology, ensuring that the adhesive stays on the label and off your rollers. For users of the LabelWriter 550 and 5XL series, using genuine labels is especially critical as these machines are designed to recognise the authentic chips for optimal print speed and health monitoring.
Storage and Handling of Label Rolls
How you store your label rolls before they even reach the printer affects maintenance requirements. Store your rolls in a cool, dry place and keep them in their original packaging until needed to prevent the leading edge from collecting warehouse dust. If a roll has been sitting on a shelf for several years, the adhesive may have degraded, making it more likely to leave residue behind. Always inspect the first few labels on a roll for any signs of yellowing or stickiness on the backing. If you're experiencing recurring jams despite regular cleaning, please contact our specialist team to discuss your specific printing environment and application.
Optimising Your Labelling Setup for Long-Term Reliability
A professional approach to equipment care involves moving from reactive fixes to a systematic maintenance schedule. For business-critical operations, we recommend maintaining a simple logbook for every printer in your fleet. Recording every time you perform a deep clean or run a cleaning card helps identify patterns. For example, you might find a specific workstation requires more frequent attention due to its proximity to a warehouse door. This data-driven approach ensures you aren't just reacting to failures; you are actively managing the health of your hardware.
Staff training is another cornerstone of long-term reliability. Ensure everyone on your team knows how to clean dymo labelwriter units safely, particularly the basic use of cleaning cards between rolls. When operators understand how to clear a minor jam without using metal tools, you minimise the risk of accidental damage to the platen roller. Software also plays a vital role. Ensuring your DYMO driver is up to date helps maintain harmony between your operating system and the hardware, preventing communication errors that can look like mechanical faults.
If your daily print volume has outgrown your current setup, you might find that the frequency of required cleaning becomes a bottleneck. In these instances, upgrading to a high-capacity LabelWriter 5XL can improve efficiency. These robust machines are designed for the rigours of industrial use, featuring durable components that handle high-volume runs with greater poise than entry-level models.
When Cleaning Isn't Enough: Identifying Hardware Wear
Even with meticulous care, thermal components eventually reach the end of their service life. If you notice a persistent vertical white line that remains after multiple cleanings, you likely have a 'burnt-out' pixel in the thermal array. Similarly, if labels regularly slip or feed at an angle despite a clean path, the platen roller may have lost its grip. When these physical signs appear, it is best to contact the DYMOOnline specialist team for expert advice on whether to repair or replace your unit.
Building a Maintenance Kit for Your Office
Preparation is the key to minimising downtime. Every office should have a dedicated kit containing cleaning cards, lint-free cloths, and high-purity isopropyl alcohol. For mission-critical environments where a printer failure stops production, keeping spare LabelWriter printheads on hand can be a wise investment. Having these supplies ready allows you to execute the steps for how to clean dymo labelwriter hardware the moment a print error is detected, ensuring your labelling station remains a reliable part of your Australian business workflow.
Protecting Your Professional Labelling Standards
Consistent maintenance is the most effective strategy for preventing unscheduled downtime in your office or warehouse. By recognising the early signs of residue build-up and implementing a routine cleaning schedule, you protect the sensitive thermal elements that define your print quality. Understanding how to clean dymo labelwriter components ensures that your barcodes remain scannable and your shipping labels stay professional, even during high-volume periods. Using genuine DYMO cleaning cards and labels remains the best defence against the unique challenges of the Australian climate.
As a specialist Australian DYMO supplier since 2009, DYMOOnline provides more than just hardware. We maintain a full inventory of genuine cleaning supplies and offer expert technical support for all LabelWriter models, including the latest 5 series. Need expert advice on maintaining your DYMO printer? Contact the DYMOOnline team today.
A few minutes of preventative care today will keep your despatch workflow moving smoothly for years to come.
Frequently Asked Questions
Can I use a regular alcohol wipe to clean my DYMO LabelWriter?
No, regular household or medical alcohol wipes are unsuitable for thermal printers. These wipes often contain fragrances, moisturisers, or other additives that leave a greasy film on the thermal printhead. This residue can actually attract more dust and interfere with the heat transfer required for clear printing. Always use 90% or higher isopropyl alcohol or genuine DYMO cleaning cards to ensure the surface remains pristine.
How often should I use a cleaning card in my LabelWriter 550?
We recommend running a cleaning card through your machine every time you load a new roll of labels if you're in a high-volume warehouse. For standard Australian office environments, a monthly cleaning session is generally sufficient. Regular use of cleaning cards is the best way to prevent adhesive build-up from damaging the sensitive sensors inside the LabelWriter 550 series.
What causes the white lines on my DYMO labels?
Horizontal white lines are almost always caused by dust or adhesive residue blocking the thermal elements from heating the label. When a speck of debris sits on the printhead, it acts as an insulator, leaving a blank streak across your printout. This is a clear sign that you need to learn how to clean dymo labelwriter components before the residue bakes onto the head and becomes permanent.
Is it safe to use a cotton bud and methylated spirits for cleaning?
It is significantly safer to use pure isopropyl alcohol rather than methylated spirits. Methylated spirits contain additives and denaturants that can leave a cloudy residue on the printhead after the liquid evaporates. This film can eventually degrade print quality and lead to scanning issues with your barcodes. Isopropyl alcohol evaporates completely, leaving no traces behind that could interfere with the thermal process.
My labels are sticking to the roller; how do I remove them without damage?
You should use a cotton bud dampened with isopropyl alcohol to slowly dissolve the adhesive as you peel the label away. Never use a knife, screwdriver, or any metal object to scrape labels off the platen roller. Even a microscopic scratch on the rubber surface will cause labels to jam or slip in the future, often requiring a complete replacement of the roller assembly.
Why does my DYMO printer say 'Out of Paper' when I just cleaned it?
This error usually means the optical sensor is still obscured by a smudge or a stray piece of lint from your cleaning cloth. If the sensor window is clouded, it can't detect the labels passing over it. Open the cover and ensure the small plastic sensor window is completely dry and clear of any cleaning fluid streaks before you try to print again.
Does using generic labels make my printer dirty faster?
Yes, generic labels frequently use inferior adhesives that are more prone to "oozing" when exposed to the heat of the thermal printhead. This excess adhesive collects on the rollers and the printhead, creating a sticky environment that traps warehouse dust. Using genuine labels reduces the frequency of maintenance and is particularly important for the 550 and 5XL models to maintain their internal health sensors.
How do I clean the sensor on a DYMO LabelWriter 5XL?
The sensor on a LabelWriter 5XL is located in the label feed path and should be cleaned with a dry, lint-free cotton bud. After removing the label roll, look for the small plastic window near the entry point. Gently wipe away any accumulated paper dust. If you've been researching how to clean dymo labelwriter sensors because of persistent errors, a light wipe with a bud dampened with isopropyl alcohol can remove more stubborn clouds.
General Information
This article is provided as general information only to help customers compare and choose DYMO label makers, label printers, label tapes, label rolls, shipping labels, address labels, barcode labels and related labelling supplies. Product details, specifications, compatibility, availability, pricing and suitability may vary. Always check the individual product page, manufacturer information, printer model compatibility and label size requirements before purchasing or using a product.
Latest News
Asset Labelling Solutions for Australian Schools: The 2026 Buying Guide
Imagine walking into a classroom at the end of term only to find that dozens of new student laptop...
The Ultimate Guide to Professional Archive Box Labelling Systems
Imagine the frustration of an urgent compliance audit where the only thing standing between you an...
How to Print Address Labels from Excel: A Step-by-Step Guide for Australian Businesses
How much time did your team spend this week manually typing customer addresses into a template, on...
The Truth About Dymo Labels: Myth-Busting Genuine vs Generic in 2026
On a busy Monday morning, an Australian business owner discovers their printer has ground to a hal...
Best Address Label Printer for Mac in Australia: 2026 Buying Guide
Updating your macOS shouldn't feel like a gamble with your office hardware, yet many Australian prof...
Choosing the Right DYMO LabelWriter 550 Labels: A Specialist Guide for Australian Businesses
Imagine you've just unboxed a new LabelWriter 550 Turbo, ready to streamline your warehouse shipping...