The Complete Guide to the Dymo Embossing Label Maker: A Timeless Australian Favourite

While the world pivots toward smartphone apps and wireless connectivity, the most reliable tool in your workshop might actually be a piece of manual engineering that hasn't changed its core design in decades. The dymo embossing label maker remains a permanent fixture in Australian sheds, kitchens, and warehouses because it offers a level of tactile durability that digital printers often struggle to match. You've probably experienced the frustration of an electronic label peeling away in the heat or finding your device dead just when you need to organise a project.
We understand that sometimes the best solution is the one that doesn't require a software update or a fresh set of batteries. In this comprehensive guide, we'll show you how to master your embossing tool to produce crisp, white-on-colour lettering that stands the test of time. You'll learn the technical nuances of tape compatibility, from standard plastic to heavy-duty stainless steel options for industrial environments. We'll also provide practical maintenance tips to keep your labeller punching clearly for years to come, ensuring your spaces stay organised without any unnecessary technology overhead.
Key Takeaways
- Understand why manual labelling remains the most reliable choice for Australian sheds and workshops where batteries and electronics often fail.
- Master the "Firm Press" technique to ensure every character on your dymo embossing label maker is perfectly white and readable.
- Learn how embossed tape resists fading in harsh Australian UV sunlight and remains legible even when exposed to grease or chemicals.
- Discover how to troubleshoot common issues like character misalignment and tape jams to extend the life of your tool.
- Identify the most cost-effective way to start your organisation project by comparing professional models and starter bundles.
The Enduring Appeal of the Dymo Embossing Label Maker
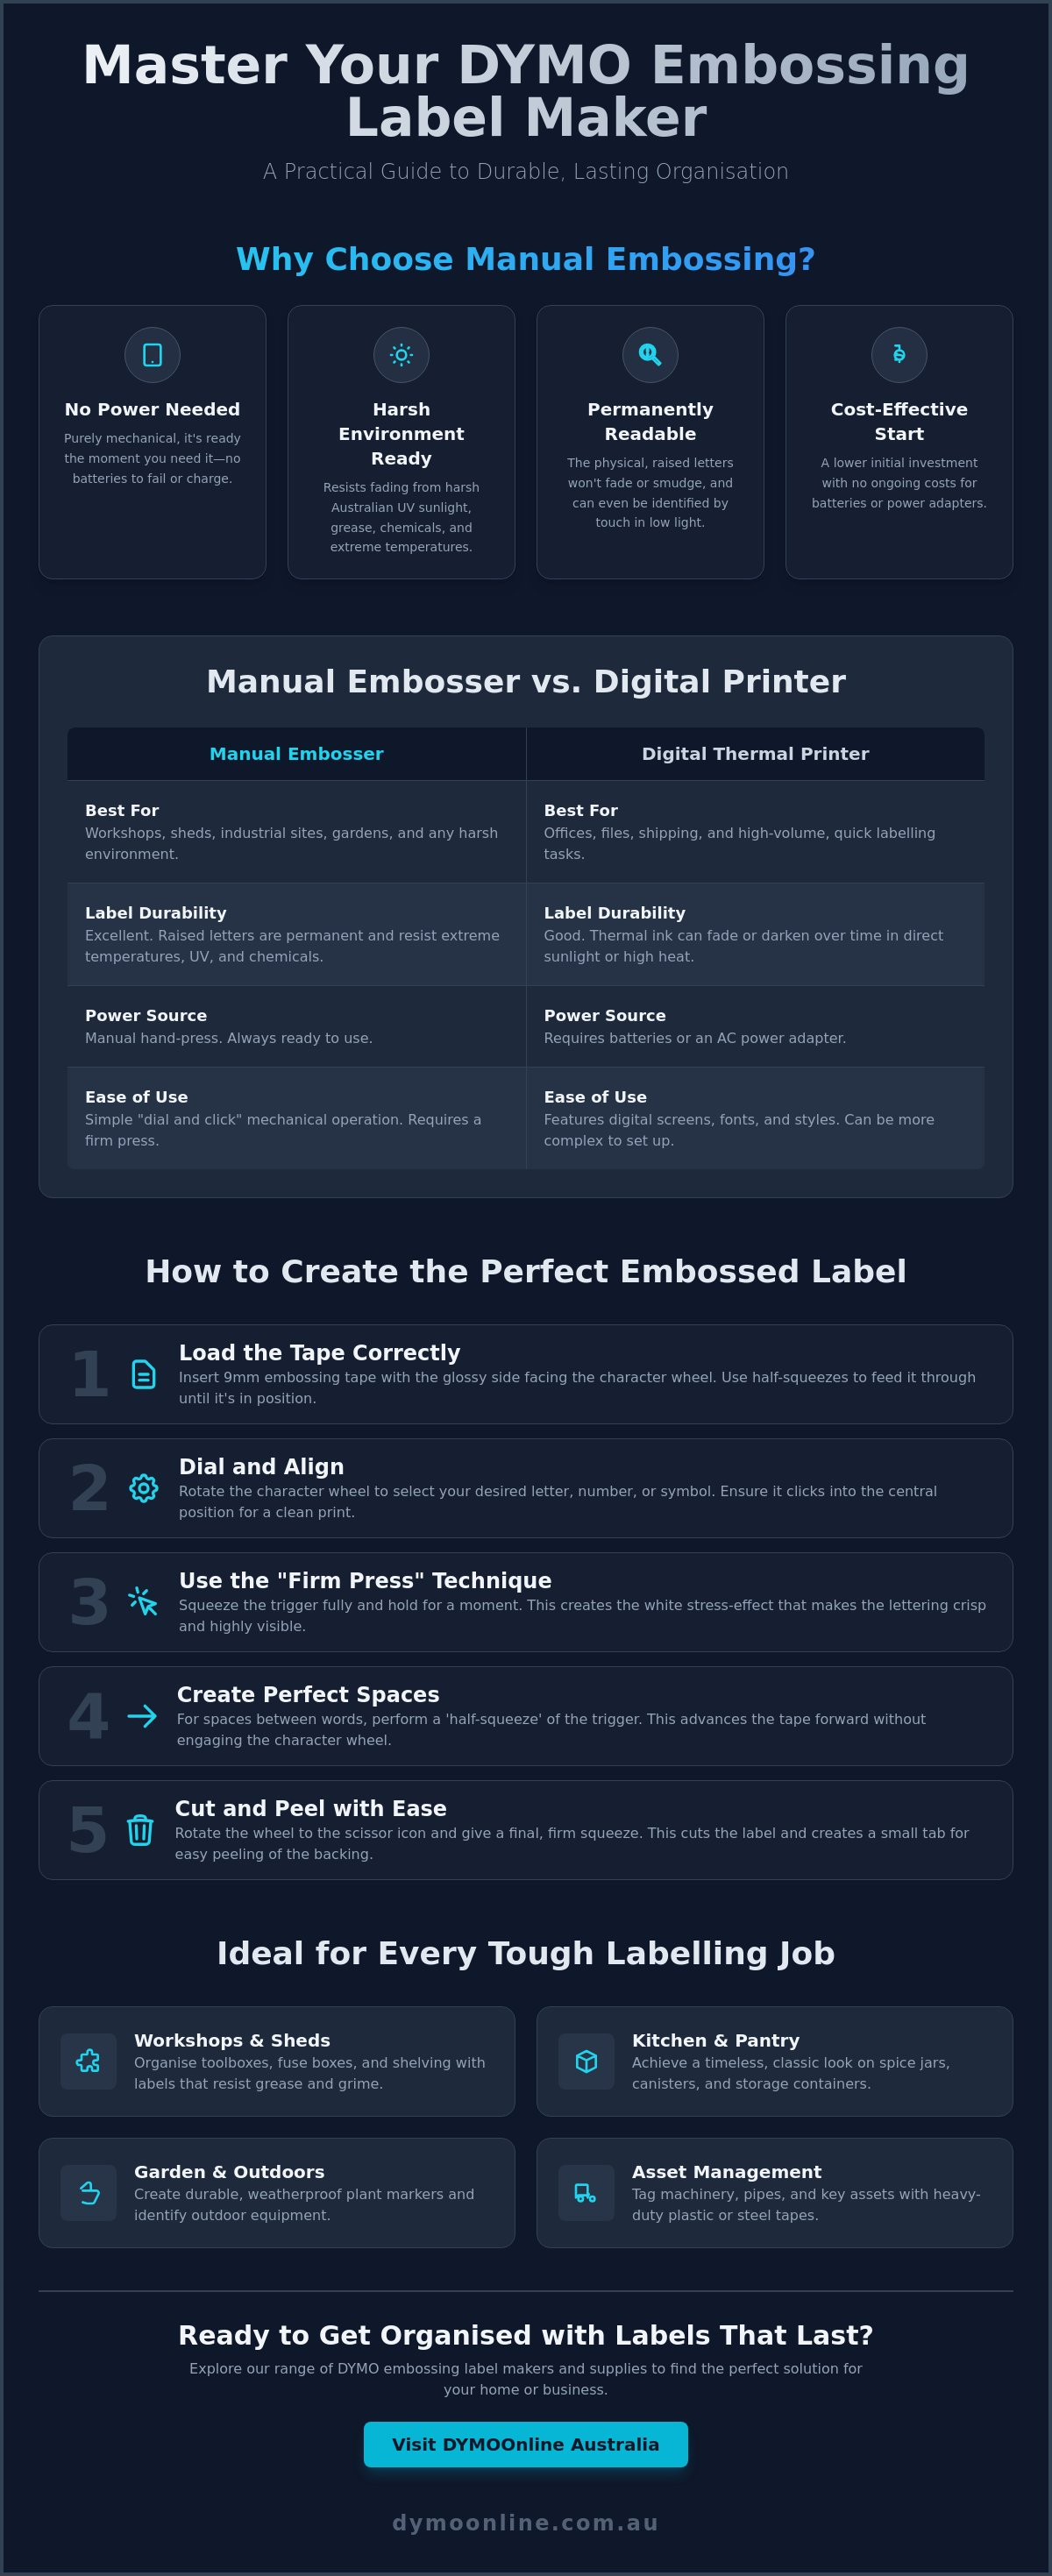
The dymo embossing label maker is a staple of Australian organisational history. While newer thermal printers offer digital convenience, the manual embosser relies on a mechanical process to create raised, white characters on durable plastic tape. This physical deformation of the tape creates a permanent, high-contrast label that won't smudge or fade. It's a "press-and-click" system that provides immediate results without needing a power source or complex software setups.
In a remote Australian workshop or a dusty garden shed, reliability is everything. Electronic devices often fail due to battery corrosion or screen damage in harsh environments. The manual embosser has no circuits to fry and no batteries to leak. It works as well in the heat of an Australian summer as it does in the cold of an Australian winter, performing reliably across the nation's diverse environments. This makes it an essential tool for environments where technology overhead is a hindrance rather than a help. You can leave it in a toolbox for years and it will still be ready to work the moment you pick it up.
Beyond reliability, there is a distinct tactile advantage. The raised lettering allows you to identify items in low-light areas simply by touch. This makes them ideal for fuse boxes, dark storage corners, or for users with visual impairments. Additionally, the "retro" look has seen a massive resurgence in home organisation. Modern Australian kitchens often feature these classic labels on glass jars for a clean, timeless aesthetic that looks more intentional and permanent than a standard printed sticker.
Embossing vs. Digital: Which Should You Choose?
Choosing between a manual tool and a digital model like the Dymo LabelManager 160 depends on your specific environment. Digital printers are excellent for office files and high-volume tasks. However, manual embossing outperforms electronic alternatives in extreme temperatures where thermal ink might fade or darken. From a cost perspective, manual labelling involves a lower initial investment and eliminates the need for ongoing battery replacements or AC adapters.
The Anatomy of a Dymo Embossing Tool
Modern tools like the Organiser Xpress are designed with a focus on longevity and ease of use. The primary component is the character wheel, which allows you to rotate through letters, numbers, and symbols with precision. The ergonomic trigger mechanism requires a firm press to ensure the characters are embossed clearly. A standout feature of these tools is the integrated tab-cutting system. This creates a small, un-adhered edge on the tape, making it much easier to peel off the backing. This simple mechanical addition saves time and reduces the frustration often associated with manual labelling tasks.
Step-by-Step Guide: Mastering Your Dymo Embosser
Using a dymo embossing label maker is a mechanical skill that rewards patience and consistent technique. Unlike digital printers that handle formatting automatically, a manual labeller requires the operator to manage alignment, spacing, and pressure. Before you start, always check that the character wheel is properly seated. If the wheel is slightly off-centre, your letters will appear skewed or partially cut. A quick visual check of the alignment notch ensures your labels look professional from the first click.
The secret to those iconic, high-contrast white letters is the "Firm Press" technique. You must squeeze the trigger fully and hold it for a split second. This ensures the plastic is sufficiently deformed to create the white stress-effect that makes the lettering pop. If your letters look faint or inconsistent, you're likely not applying enough pressure. To manage word gaps, master the "half-squeeze". By pulling the trigger only halfway, you advance the tape without engaging the character wheel, creating perfect spaces between words.
Professional-grade labels also require a clean finish. Once you've finished your text, rotate the wheel to the scissor icon. A full, firm squeeze here engages the built-in blade. This doesn't just cut the tape; it typically creates a small perforation that makes the backing easy to peel away, saving you from picking at the edges with your fingernails.
How to Load 9mm Embossing Tape Correctly
Loading the tape correctly is the most important step to prevent mechanical jams. Start by inserting the 9mm tape into the feed slot, ensuring the glossy side is facing the character wheel. Push the tape forward until it meets the resistance of the wheel. Once in position, give the trigger several light half-squeezes to advance the tape through the rollers. A common mistake is loading the tape skewed; if it isn't perfectly straight, it will eventually bunch up inside the mechanism. If you encounter resistance or the tape won't advance, contact our technical specialists for guidance on clearing the feed path.
Mastering the Character Wheel and Symbols
The character wheel on your dymo embossing label maker provides access to the full alphabet, numbers, and essential symbols like the dollar sign ($) and the "@" symbol. To achieve the best visual results, maintain a steady rhythm while rotating and clicking. This consistency ensures the depth of every letter is uniform across the entire label. Always ensure you have advanced the tape past the "cut" position before starting a new word to avoid overlapping your previous label's tail.
Practical Applications: Where to Use Your Embossed Labels
The utility of a dymo embossing label maker extends far beyond basic desk organisation. Because the characters are physically punched into the tape, the resulting labels possess a level of environmental resistance that most digital alternatives lack. This is particularly relevant in Australia, where extreme UV levels can bleach the ink off standard thermal labels within a single summer season. An embossed label doesn't rely on ink; the white lettering is a permanent structural change in the plastic. This means it remains legible even after years of direct exposure to the sun on garden stakes, letterboxes, or external plumbing pipes.
In the workshop, these labels are often the only viable choice for marking tool chests, chemical containers, and machinery. Grease, oil, and solvent splashes that would typically dissolve or smudge printed ink have no effect on the raised characters. If a label becomes covered in grime, you can simply wipe it down with a rag and the text remains perfectly clear. For electrical and plumbing work, physical identifiers are essential for safety. Marking shut-off valves and circuit breakers with permanent, embossed tape ensures that vital information is never lost due to environmental wear or battery failure in a digital device.
Industrial and Workshop Resilience
Physical embossing remains readable even if the label is coated in a layer of sawdust or lubricant. The 3D profile of the letters ensures that the information is accessible by sight or touch. To ensure maximum adhesion in non-climate-controlled sheds, it is vital to clean the application surface with a degreaser or isopropyl alcohol first. This removes any residual oils that might prevent the adhesive from bonding permanently. For heavy-duty industrial environments where metal or heat-shrink solutions are required, professionals often look to Dymo industrial labels and specialised tools to meet site regulations.
Creative and Decorative Home Uses
The textured, premium feel of embossed tape adds a professional finish to home office equipment and archival folders. It's also a popular choice for personalising gifts and scrapbooks, where the retro aesthetic provides a sense of traditional craftsmanship. By selecting different embossing tape colours, you can create a logical filing system that is easy to navigate at a glance. This allows you to colour-code household zones, such as using red for emergency equipment and green for garden supplies, ensuring that every family member can find what they need quickly.
Maintenance and Troubleshooting for Manual Labelers
Maintaining a dymo embossing label maker is straightforward because there are no electronic circuits or delicate print heads to fail. However, mechanical residue can occasionally impact the quality of your output. If you notice your labels are becoming faint, it's usually a sign that your grip pressure has become inconsistent. These tools are built for longevity, but they require a firm, deliberate squeeze to fully deform the plastic tape and create that characteristic white lettering. If the problem persists after adjusting your technique, the internal mechanism might need a quick inspection for debris.
Tape jams are the most common mechanical hurdle, often occurring if the tape was loaded at a slight angle or if the feed path is obstructed. If the character wheel won't turn, do not force it. This resistance usually indicates that a small fragment of tape backing or adhesive residue has lodged in the gears. You can often clear these blockages by gently reversing the tape or using a pair of tweezers to remove debris from the feed slot. Keeping the character wheel clean is also essential; wiping it with a soft cloth dampened with a small amount of isopropyl alcohol will remove adhesive migration and keep your letter definitions sharp.
In the Australian climate, storage is a critical factor for tool health. High temperatures in sheds or vehicles can cause the plastic tape to curl or the adhesive to degrade prematurely. Always store your embosser and spare tapes in a cool, dry place, away from direct sunlight. This prevents the tape from becoming brittle and ensures the adhesive remains effective when you're ready to start your next project.
Fixing Common Tape Spacing Issues
If you find your letters are overlapping, it usually indicates a slip in the feed rollers. This happens when the rollers become slick with age or residue. Clean the rollers with a dry cotton bud to restore their grip and ensure the tape advances correctly. To reset the wheel if it becomes misaligned, rotate it fully three times and then align the starting notch with the indicator arrow.
When to Replace Your Embossing Tape
Even high-quality tape has a shelf life. If your labels are peeling off surfaces they previously adhered to, the adhesive has likely dried out due to age or heat exposure. We recommend using genuine Dymo embossing tapes to ensure the thickness is perfectly matched to the machine's punch depth, as generic alternatives can gum up the internal cutters. Store your spare cassettes in a sealed container to maximise their shelf life and prevent the edges from catching grit. If you're experiencing persistent mechanical issues that basic cleaning won't resolve, speak with our technical support team for expert advice on your specific model.
Choosing the Right Dymo Embossing Model and Supplies
Selecting the right hardware is the final step in establishing a reliable labelling system. The dymo embossing label maker market is dominated by models like the Organiser Xpress Pro because they balance industrial-grade durability with handheld convenience. It's a tool built to withstand the rigours of a busy workshop while remaining comfortable enough for home pantry projects. While some specialised industrial embossers use wider metal tapes, the 9mm plastic tape remains the universal standard for manual embossing. This consistency ensures that you can find replacement rolls easily and that your labels will fit standard storage containers and folder spines across Australia.
When you're starting a new project, the choice between a single unit and a bundle often comes down to long-term value. Single units are ideal for replacing an old tool, but for those new to manual labelling, a starter kit provides everything needed to begin immediately. Buying genuine supplies from a specialist Australian online store ensures you receive authentic products that have been stored correctly for our local climate, preventing the premature adhesive failure often seen with generic alternatives.
The Organiser Xpress Pro Bundle Advantage
The Organiser Xpress Pro bundle is frequently cited as the gold standard for handheld embossing. These kits typically include the labeller itself along with three essential tape rolls, providing a significant cost saving compared to purchasing items individually. The machine features an ergonomic design with a rubberised grip, which is a vital feature for minimising hand fatigue during large labelling projects. If you're managing a school or a large warehouse and require bulk quantities, you can contact our specialist team for professional supply enquiries.
Why Genuine Dymo Embossing Tape Matters
Using generic or compatible tapes carries a high risk of damaging your tool's internal components. Genuine Dymo tape is manufactured with a specific thickness and hardness that the machine's plastic blade and rollers are designed to handle. Third-party tapes are often either too thin, leading to faint characters, or too stiff, which can chip the character wheel or dull the cutter. Genuine tapes also offer superior consistency in colour and the "whiteness" of the embossed characters, ensuring your organisational system looks uniform. You can explore the full Dymo embossing range to find specialised colours and tape types for your specific application.
Maximise Your Organisational Efficiency with Manual Labelling
The dymo embossing label maker remains a vital tool for those who value reliability and durability over digital complexity. By mastering the physical technique of embossing and choosing high-quality genuine supplies, you ensure your labels withstand the unique challenges of the Australian environment. Whether you're marking pipes in a workshop or organising a home pantry, these raised characters offer a level of permanence that thermal ink simply cannot match.
Since 2009, we've operated as a specialist Australian supplier, providing expert support for the entire DYMO ecosystem. We understand the technical requirements of industrial and residential labelling alike. With nationwide shipping and same-day metropolitan dispatch, we help you get your project moving without delay. If you're unsure which model or tape type suits your specific application, we're ready to assist with professional guidance.
Need help choosing the right labelling tool? Contact our Australian experts today. We look forward to helping you achieve a perfectly organised workspace that stands the test of time.
Frequently Asked Questions
Do Dymo embossing label makers require batteries or electricity?
No, these devices are purely mechanical and don't require batteries or any external power source. You operate the tool by manually rotating the character wheel and squeezing the trigger to punch letters into the tape. This makes them a reliable choice for remote Australian worksites or garden sheds where charging infrastructure or fresh batteries aren't always available.
Can I use different widths of tape in my Dymo Organiser Xpress?
The Dymo Organiser Xpress is designed specifically for 9mm embossing tape and isn't compatible with other widths. Using 6mm or 12mm tapes will cause the feeding mechanism to jam or result in misaligned characters. While some industrial models handle varied sizes, 9mm remains the universal standard for most handheld manual labellers used in home and office environments.
Are embossed labels waterproof and suitable for outdoor use in Australia?
Yes, embossed plastic labels are water-resistant and exceptionally durable in harsh outdoor environments. Unlike thermal labels that often fade under intense Australian UV sunlight, the raised white characters on a dymo embossing label maker are a structural change in the plastic tape. This ensures they remain legible for years on garden stakes, letterboxes, or external piping without smudging or bleaching.
How do I stop my Dymo labels from peeling off surfaces?
The most effective way to prevent peeling is to ensure the application surface is completely clean and dry before sticking the label. Use a degreaser or isopropyl alcohol to remove oil, dust, or moisture from the area. Additionally, apply firm pressure across the entire label after placement to activate the adhesive bond, especially on textured or curved surfaces in non-climate-controlled workshops.
Can I get different colours of embossing tape besides black?
Yes, embossing tapes come in a variety of colours, including red, blue, green, and yellow. These assorted colours are excellent for colour-coding household zones or identifying specific tool categories in a warehouse. Using genuine Dymo tapes ensures the colour remains vibrant and the white embossed text provides the highest possible contrast for easy reading.
What characters and symbols are included on the standard Dymo embossing wheel?
The standard character wheel includes the full A-Z alphabet in uppercase, numbers 0-9, and essential symbols such as the dollar sign ($) and the "@" symbol. Most wheels also feature a decimal point, a dash, and a scissors icon for cutting. This selection covers the majority of organisational needs for home offices, kitchens, and industrial workshops across Australia.
Is it difficult to load a new roll of tape into the machine?
Loading a new roll is a straightforward process that takes less than a minute once you understand the feed path. You simply insert the tape into the designated slot until it reaches the internal rollers, then use the trigger to advance it to the start position. Ensuring the tape is cut straight before insertion prevents most common loading jams or alignment issues within the dymo embossing label maker.
Why are the letters on my Dymo labels coming out faint or uneven?
Faint or uneven lettering is almost always caused by inconsistent grip pressure on the trigger mechanism. To achieve a crisp, white finish, you must squeeze the handle fully and hold it for a brief moment to ensure the plastic is properly deformed. Maintaining a steady, firm rhythm during the labelling process will produce the most professional and uniform results for your project.
General Information
This article is provided as general information only to help customers compare and choose DYMO label makers, label printers, label tapes, label rolls, shipping labels, address labels, barcode labels and related labelling supplies. Product details, specifications, compatibility, availability, pricing and suitability may vary. Always check the individual product page, manufacturer information, printer model compatibility and label size requirements before purchasing or using a product.
Latest News
Asset Tag Printer: 2026 Australian Buying Guide
When an expensive piece of portable equipment goes missing from a job site or office, the real cos...
Asset Labelling Solutions for Australian Schools: The 2026 Buying Guide
Imagine walking into a classroom at the end of term only to find that dozens of new student laptop...
The Ultimate Guide to Professional Archive Box Labelling Systems
Imagine the frustration of an urgent compliance audit where the only thing standing between you an...
How to Print Address Labels from Excel: A Step-by-Step Guide for Australian Businesses
How much time did your team spend this week manually typing customer addresses into a template, on...
The Truth About Dymo Labels: Myth-Busting Genuine vs Generic in 2026
On a busy Monday morning, an Australian business owner discovers their printer has ground to a hal...
Best Address Label Printer for Mac in Australia: 2026 Buying Guide
Updating your macOS shouldn't feel like a gamble with your office hardware, yet many Australian prof...